However, that driver clobbers the in-built wireless Xbox 360 controller support – immediately our old Xbox 360 controller stopped working along with the two different 8BitDo Ultimate and Ultimate 2.
I could get the 8BitDo controllers to work by disconnecting their receivers and instead connecting via bluetooth. However, support on bluetooth was iffy and connectivity was a spotty – often requiring a reconnection each time we wanted to use them.
I ended up moving the Xbox controller to bluetooth and removing the Xone driver, keeping the 8BitDo controllers on 2.4GHz.
But then my son “needed” a headset (or, in fact, needed to stop borrowing my wife’s headset).
Options were:
Long USB cable headset (Expensive-ish, inconvenient)
At the completion of year 11 exams, students at my school are expected to return for 4 weeks to “begin year 12”.
Rather than set a bunch of individual assessments, or run a formal test only for students to disappear on 8 weeks holidays, I prefer to work on a collaborative multiplayer game – a different one each year – which is closer in development approach to a game jam than a traditional cycle or scrum.
Prototype: Chestral
The first year we did this, we created Chestral – a simple game which set the structure for the two subsequent projects.
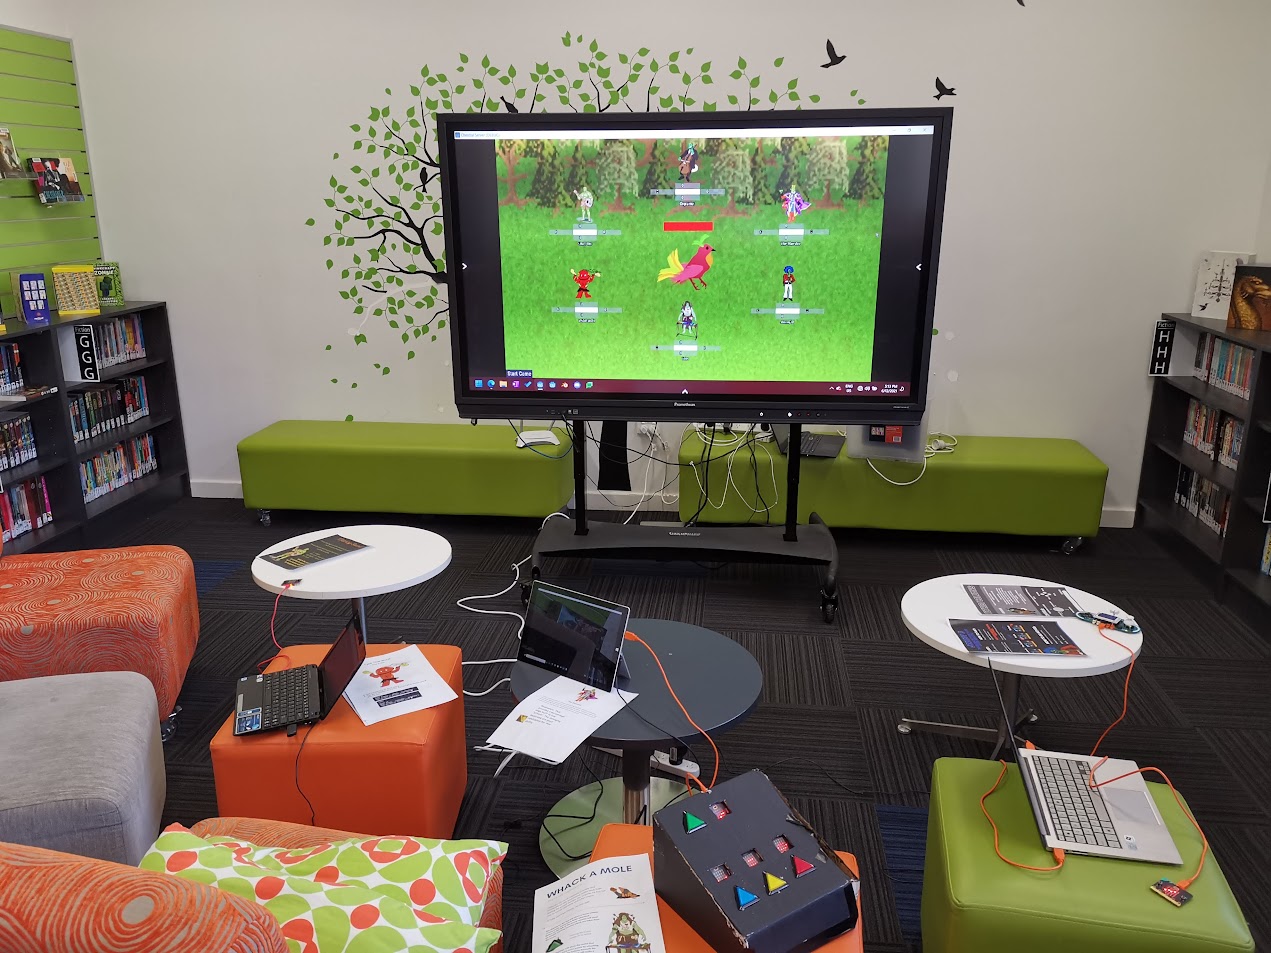
The goal was to have a “main screen” server which presented the graphics, progress etc for all players to look at, while the clients connecting to the server would be coded by individual students and would effectively be minigames.
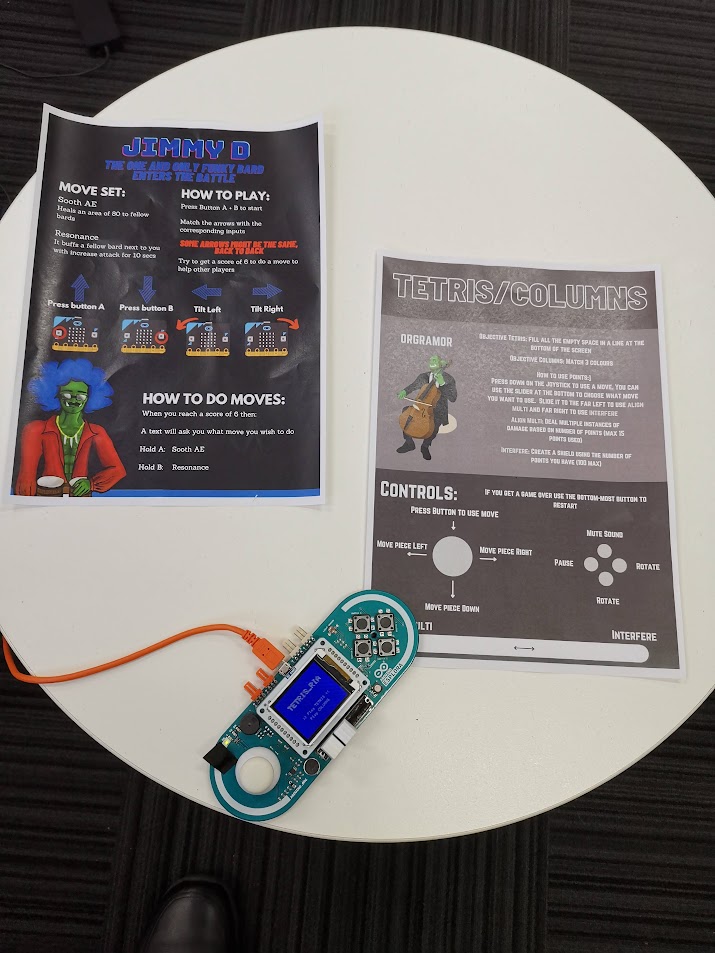
Alysha’s and Kelvin’s client instructions. Creating documentation was a big part of the project.
The implementation is very similar to the Jackbox Games model – everyone looks a one big screen while each having their own little ones. In Chestral’s case, the actual game itself was designed to be like an MMO raid boss fight.
The final setup on Showcase day. Each client had its own specific hardware requirements, which was a nightmare.
Chestral was overly simplistic in its rules for clients – most players would just focus on their client’s minigame and let the “raid leader” – the Maestro – handle the encounter.
It was still fun, and there was an enormous depth and variety of learning (client/server models, APIs – even getting the hardware to run the clients on the day was a huge exercise) and excellent engagement, as all the 11s turned up on our school’s showcase day to set up and exhibit the game, despite it being their first day of holidays.
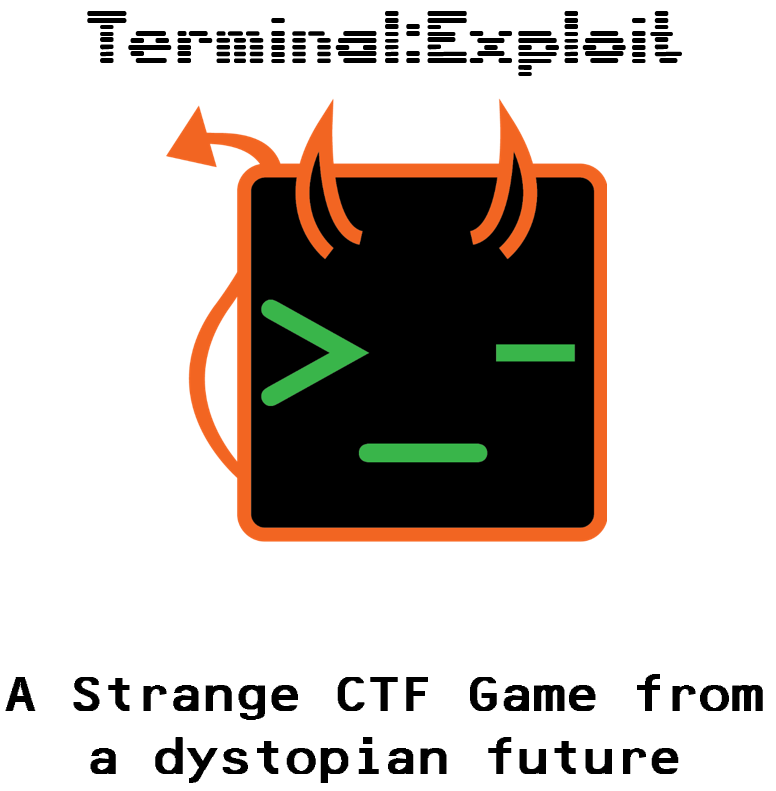
Terminal:Exploit
My next year 11 class was working in the new Computer Science syllabus – which is far more demanding (particularly with regards to programming) and this meant a higher standard of complexity could be expected from the clients they produced.
Terminal:Exploit was conceived as a game structured around the cyber security and network protocol concepts covered in the course. In contrast to the cooperative nature of Chestral, Terminal:Exploit pits two teams of four against one another.
We kept the same overall client/server structure (one big screen, each client has small screens) but took the lessons of Chestral’s implementation (don’t design your clients to run only on the developer’s hardware!) and specifically developed the clients to
All have identical hardware/library requirements
Be purely text based (hence, terminal)
Be designed for specific, available hardware (SOE laptops provided by the school)
Some of the more ambitious students pushed for clients which were Godot implementations, rather than terminals, but these were not able to be integrated in time.
T:E is a more exciting and more complete game experience when compared to Chestral; the learning curve is steep and the concept is so abstract as to frighten off prospective players, but once you’ve played a round or two, you get the hang of it and it becomes a very compelling team PvP experience.
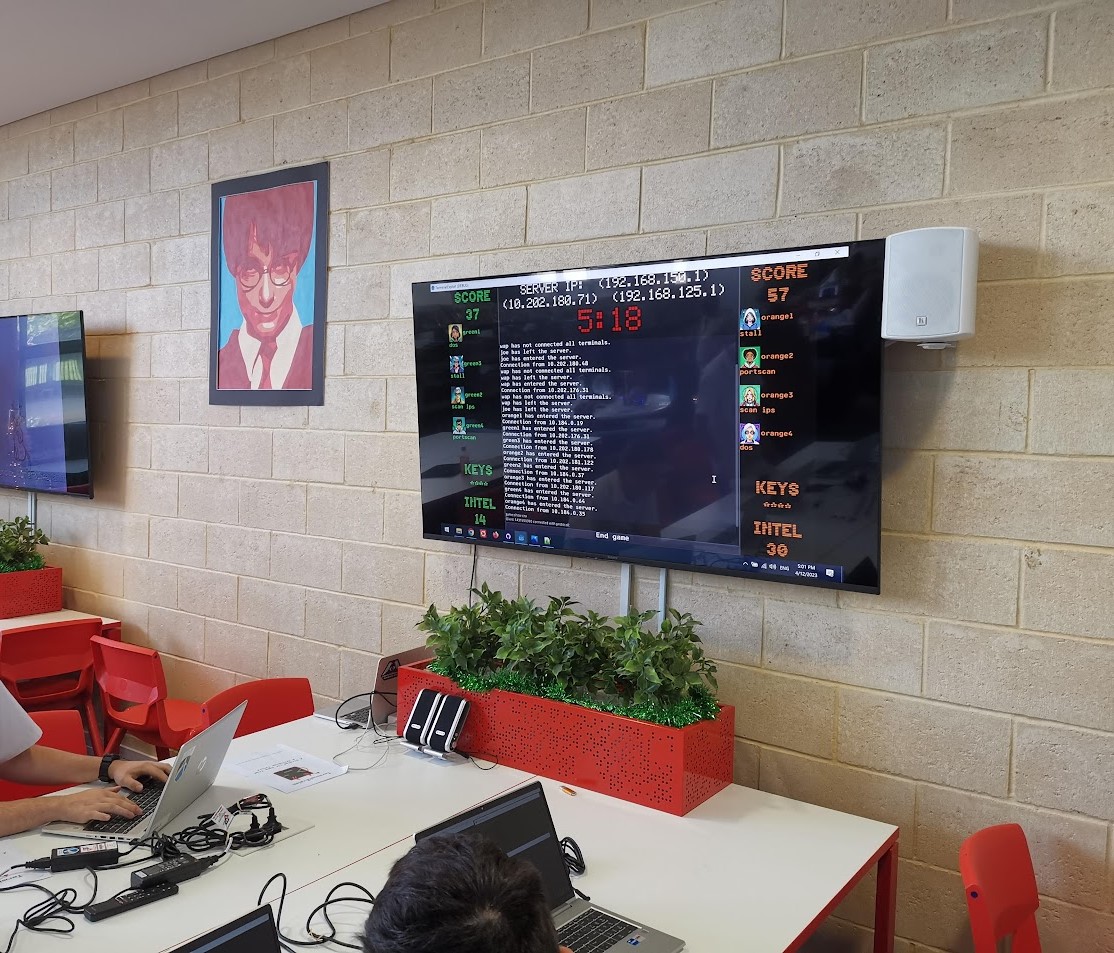
The game objective is simple enough – either steal all your opponents’ keywords before the game timer expires or have more points than the opposing them when the timer does expire. Executing commands in one of the terminals to “connect” to your opponents allows you to discover and claim their keywords.
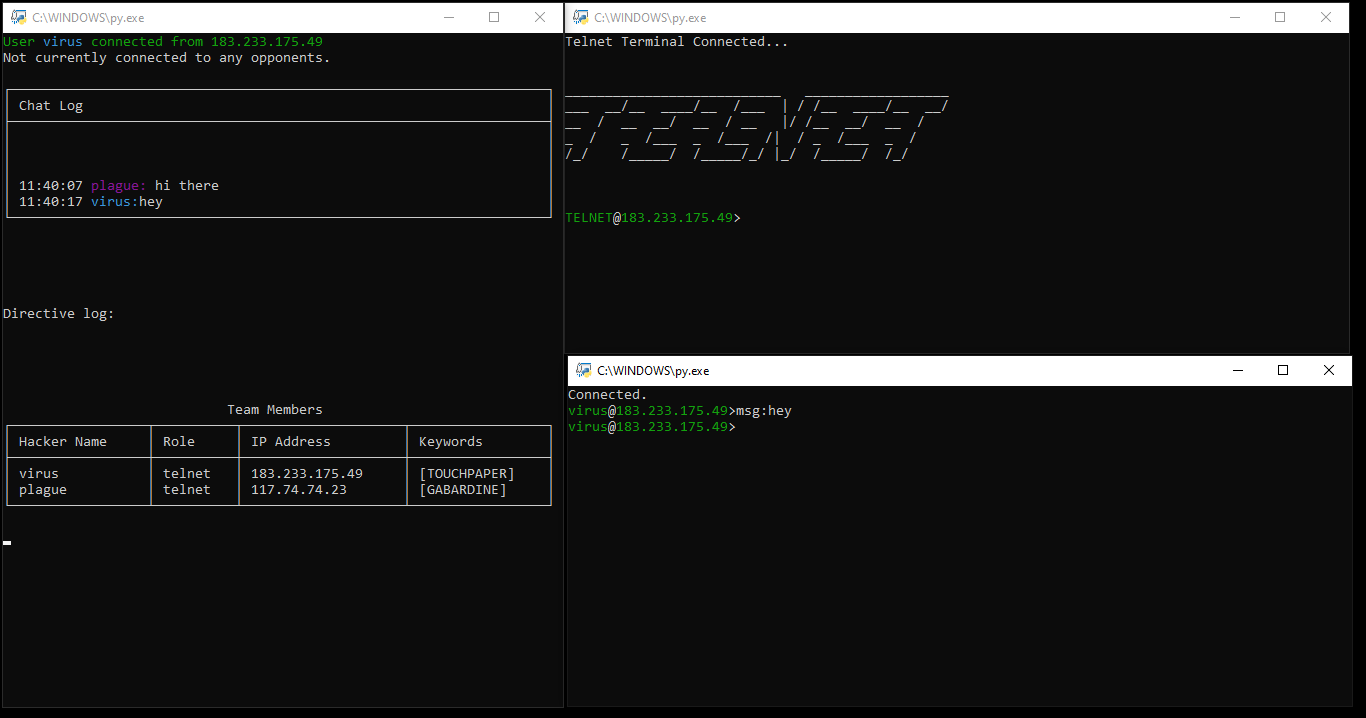
A typical client device will look like this:
There are actually three terminals on the screen for each client!
It would be technically quite possible to combine the functionality of all three terminals into one – but this would require a more aggressive use of threading, which I wanted to avoid, and make the separation of tasks more complex (a single student worked on the command terminal in the bottom right, two students worked on the status terminal in the left hand side and each game terminal was different depending on the client mode).
Clockwise from the left side terminal:
Status terminal. Non-interactive, this terminal provides a 5 line chatlog for your team, current directives (instructions for use with the game terminal) a table of team members and keywords, and, once the game starts, a table of opponent data as it is discovered by your team.
Game terminal – in this case, telnet. In theory, each game terminal was intended to be a new protocol – the player must manage their “server” to earn points and intel to be used in the wider game. In practice, we only managed to get two game modes running – telnet and SMTP. Partially/mostly complete were FTP and SSH terminals, along with more free form/less terminal-like modes UDP/TCP (simulating packet processing, similar to a firewall) and YTOS (simulating scheduling on an operating system).
Command terminal. The command terminal is a general purpose thin client – it allows players to communicate with their team as well as move keywords around and use abilities. In addition, the command terminal is the terminal from which a player can “connect” to an opponent’s game terminal.
Much work was done to ensure these client terminals would run on the provided systems and automatically size to fill the screen.
The majority of the processing was performed server side – this was a double edged sword. It allowed for fairly rapid development of the status and command terminals, but necessitated that the game terminals have their logic split between the client and server. Students either struggled to create code for the server to handle their game terminal or simply left it to me entirely. This was definitely a factor in the number of incomplete game terminals; on the other hand, the “connections” made from the command terminals simply could not have actually gone through to game terminals without making client development significantly more complex. I’m chalking it up as a wash; the concept behind T:E didn’t lend itself well to this specific aspect of student development, and no “best” approach exists.
Fans of Friends at the Table might notice the keywords are a little familiar – they are taken directly from the finale of Partizan (and its soundtrack). In fact, on showcase day, we used the Partizan soundtrack (from the incomparable Jack de Quidt) as music for the game. Slow, menacing, disorienting – perfect.
Of Aesthetics
The sort of terminal look I was channeling – image taken from this post
My original vision for T:E was to recreate the vibe of 70s and 80s terminals – often two-tone black background affairs with either green or orange text. The conceit is that the game is set in a dystopian future, advanced hardware and software is either lost or inscrutable – leaving rival gangs to manually manage their own servers in a deiselpunk wild west Internet.
I’m happy with the overall impression the game makes – it looks a lot less accessible than it is – which might seem like a totally backwards intention, but for me, that is the hacking scene of the 70s and 80s.
In order to play, you need to refer to a printed manual, a feature I find to be as delicious as it is absurd in the 2020s.
Merits as a Game
Is this a good game?
I think so – it’s generations ahead of Chestral in complexity and user satisfaction. Certainly, the next year’s group of students, once they got the hang of the interface, were excited to play it more than a few times.
That said, its incompleteness is its downfall – given the limited number of game terminals and the lack of progression for each one (we had envisioned a skill tree of sorts to allow each player to fill different roles more effectively), the replayability is limited. I anticipate after around a half dozen games, the shine will have worn off and players won’t want to come back.
Merits as a Learning Tool
Does this game, in and of itself, have educational value?
I think so – I find that students (and adults) generally have a fear of the terminal, often not having any idea of how to use a command line interface at all. T:E creates a motivation to build familiarity with the interface and there’s some value there.
Do players learn much about the protocols? Probably not – many liberties were taken when conceiving of the game loops for each terminal and so those skills don’t particularly translate over. That said, the SMTP game requires players to literally type SMTP protocol commands to send an email, so I guess that’s something? They learn how awful SMTP is?
There’s also some value in the basic concept of using the command terminal to connect to another player’s IP address and port (both completely fake on the backend – each terminal connects only to the server) so this might assist in understanding the concept of devices having IP addresses as well as ports for individual services.
Beyond that, communication and collaboration need to be used to have a successful team – so don’t rule out those “soft skills” as benefits.
Merits as a Project
This project pushed my students more than Chestral, so in that sense it was successful.
The abstract nature of the concept was a huge barrier to students starting – they needed to see the concept in action to grasp what was required of them, which reduced the amount of productive working time.
Students all used git repositories to manage and share code, which is an invaluable introduction to the concept of version control systems.
We pushed the idea of developing for a specific standard operating environment during this project and students were responsible for deploying and testing to this environment – which I believe to be worthwhile as it is an experience missing from a typical high school project.
And, as with Chestral, almost all students turned up to set up and demonstrate their project on what would otherwise have been their first day of holidays, so I think that speaks volumes to engagement and motivation for students.
Not an unmitigated success, but certainly a project of which I’m very proud.
I’ve recently (~6 weeks ago) replaced the very janky MPD server setup in my kitchen with a smaller Raspberry Pi 3B + DAC hat.
When I’ve attempted to run this setup in the past, it’s worked fine for maybe a week and then I’ve had network response issues – the CPU seems okay, but network connectivity is so bad, I can’t even SSH or send through an MPC stop command.
I originally figured that the issue here was weak WiFi on the Pi + weak WiFi access point and left it at that – since I seemed not to get the issue when I moved the pi into my office and connected via Ethernet.
However, I have a shiny new WiFi AP now, which has much better range and reliability, so I figured I’d give the Pi a go again – no fan, lower power usage, quiet.
Worked great! Until yesterday.
Yesterday we had a power outage. I still haven’t configured my media devices to retry NAS connections after power outages, so they often need to be re-rebooted when this happens so that they can access media libraries. This was the case with the Pi.
When it came back up, MPD was accessible but… slow again. And then songs would stutter out or controls would be unresponsive. SSH struggled to connect.
It was the old set of problems all over again.
But why?
I tried:
1) Completely unplugging the Pi and its PSU and leaving them before plugging back in – capacitors are sinister majicks, so maybe this was related to the power outage? 2) Updating the system 3) Disabling the GUI on startup (may have already been that way) 4) Checking for undervoltage messages in dmesg (none) 5) Checking wifi connectivity (iwconfig wlan0 – 64/70, no signal issues) 6) Swearing
None of these worked. Time for bed.
Upon investigating this morning, I had two “finds”, both from the mpd.log file: *Lots of “alsa_output: Decoder is too slow; playing silence to avoid xrun” *Lots of “zeroconf: No global port, disabling zeroconf”
Both these messages appeared AFTER the day of the outage but not before (except one zeroconf a few days earlier – but not 5 within a few minutes like I was receiving after)
I found a few threads similar to this one which suggested the zeroconf issue was systemd related – the “fix” suggested there did not help me.
(Also: I’d been using systemd since day one and not had this issue)
Searches relating to the “decoder too slow” message yielded little; my CPU was never the issue and my wifi connection was solid.
I tried changing the MPD config to include these settings for my output, per some suggestions:
buffer_time “200000” period_time “5084”
This did nothing.
The zeroconf issue puzzled me; I don’t need or use it, but had never had these errors before. Couldn’t I just disable it? At least that’s one fewer error to confound me.
In the mpd.conf file, you can find a line enabling/disabling zeroconf: zeroconf_enabled “no”
This… fixed it?
It doesn’t make a lot of sense.
My current hypothesis is that actually there is some deeper problem causing this issue and zeroconf failing was exacerbating it – my MPD client is still a bit sluggish, but not unresponsive like before.
I have no idea why this happened or if it is related to the power outage or if something updated and broke things. I’ll leave it for now and see how it goes.
Our house received an upgrade to full fibre optic last year, and with the increase in available home bandwidth came the opportunity to retire our old NetComm router/modem/WiFi unit, which had been, if we’re generous, “adequate”.
Or, in fact, inadequate in a number of ways – its WiFi range was actually abysmal, something I only found out when I migrated to a dedicated WiFi unit and discovered that a single device can actually cover our entire property.
Also, it “supported” IPv6, in the sense that it could, technically, have an IPv6 address for a brief period of time, before just quietly giving up on routing IPv6 traffic until you either reboot or get exasperated and switch off IPv6 support.
So in the spirit of questionable decisions, and egged on by friends who are far more skilled and experienced in this sort of thing, I purchased a cheap all-in-one fanless PC with four 2.5Gb ethernet ports.
In this house, we enumerate from zero
For the curious, it runs at around 55 degrees in the Australian summer, 65 if I make the CPU think hard. Certainly an improvement over the poor old Mac mini I have running as an MPD server in our kitchen, which routinely idles at 80 degrees.
Because I can’t ever be content to do things the easy way, I put Proxmox on it first, with the intention of running OPNsense as a VM, alongside a PiHole instance.
My initial set up experience was tainted by an inability to get OPNsense to register a connection via the WAN port, which resulted in around 45 minutes of frustration before realising that my ISP requires me to manually “kick” connections between router changes. As a result of this faffing about, I now at least have a document detailing exactly what each of the physical ethernet ports are called in Proxmox and what their MAC addresses are – probably something I should have sorted out before doing anything else anyway.
Once the router had a connection, everything ran great. For thirty minutes. After which, the router simply couldn’t talk to the gateway any more. No Internet connection.
In OPNsense’s dashboard, it indicated that EVERYTHING IS FINE. Which, you know, not true.
This is a lie.
A reboot results in the same behaviour – everything is fine for around half an hour, then no WAN connectivity. Renewing the WAN connection fixes things… indefinitely. Until another reboot.
Thus began The Troubleshooting.
Various settings and configs were checked. IPv6 disabled (just in case), hardware VLAN filtering disabled etc etc
Same behaviour.
Install a completely fresh OPNSense VM – exact. same. behaviour.
And the whole time – once I renew the WAN connection, it fixes itself for as long as it remains up. The command I ended up running in the shell:
configctl interface reconfigure wan
Magically fixed it… but only if it had already broken. That is, I couldn’t just run a renew at the end of the boot sequence and call it a day – I had to wait until the WAN connection failed before I could renew it – and that just didn’t fly (not that appending some magic words to a startup script would have made me happy).
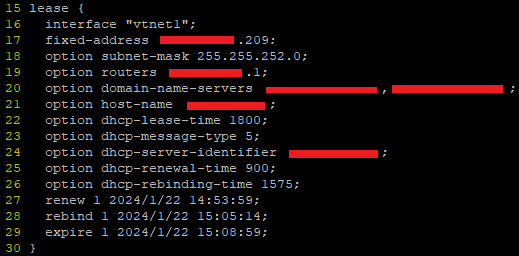
I ended up digging through the DHCP client leases file in /var/db (in my case dhclient.leases.vtnet1) and noticing some strange overlaps in the renewal/rebind/expiry etc times.
These leases files look like this:
Turns out, this a log, rather than a config – FreeBSD is writing the dates and times there as a record, not an instruction. But this was the clue to help figure it out – when router first booted, the lease file was written to but the time for renewal and expiry passed without the router even trying to renew the connection.
Once I reran the renewal command manually, it worked fine, but crucially, it was writing dates and times that were wildly different to the initial time on bootup.
Anyway, as with all things, it was DNS.
A haiku
Well, sort of.
When I set up the initial Proxmox install, I somehow (?) managed to set its DNS server to be 127.0.0.1. Surely that can’t have been the default?
Anyway, that meant that while it could do all the work of creating VMs just fine, it couldn’t, among other things, talk to NTP servers to figure out the time.
But it did know it was in the UTC+8 timezone. And it did assume that the hardware clock was in UTC time. Which it wasn’t. It was set to local time. So my VM host believed it was 8 hours ahead of when it actually was.
When my router booted up, it was given this time and it then obtained a lease and made a note to renew that lease in 15 minutes. 30 minutes, tops.
But it then used an actual DNS server to do an NTP lookup for the correct time – at which point it said to itself, “hoo boy, I am 8 hours ahead of where I should be! Lemme just fix that right up.” But its lease now thinks the expiry is not for another 8 hours – hence failing to renew and not having any WAN connectivity.
To add to the confusion with all this – FreeBSD in all its wisdom writes dates and times to the lease file in universal coordinated time – not local time – without any indication that this is what it is doing. So when the router first obtained that lease and wrote the wrong time to the log, it looked to me like the correct time, but when I renewed the lease manually, it had corrected its own time and was now logging, what appeared to me to be 8 hours in the past.
Obviously, I think everything should always just be in UTC and that there are no problems or issues that would or could be caused by adopting a world free of timezones, but, please, indicate that somewhere, hey?
Anyway, OPNSense seems fine and good. I’ve managed to do some port forwarding and set up queues to minimise bufferbloat, so all is right with the world.
Perhaps you, like me, use an MPD server to manage and play a largish music collection. Perhaps, you, like me, are finding the odd weird thing happening in your client where multiple albums appear for the same set of tracks, or tracks are split between two different, yet somehow identical albums.
Probably not though. However, this post exists to provide me with a reminder of the techniques used to resolve those issues.
Before we begin, my primary client for this library is MALP on Android – it’s actually very good, but gets grumpy if your MPD is old (FWIW mine is 0.22 – I went to the trouble of compiling by hand) and is very strict about some tags (which is a Good Thing, but can be fiddly)
Step One – Basic Tag Hygiene
Make sure the tracks for your album all have ID3v2 tags (remove all the v1 tags – don’t need ’em) and that the track numbers, total tracks, artist, albumartist and album tags are all correctly set. Any variations here can cause issues where a track magically belongs to a different album with the same name, or lives on two different albums somehow
Step Two – Check for MusicBrainz Tags
The MusicBrainz project and its tagger – Picard – are wonderful. However, music releases are squirrely and it can be hard to pin down exactly where your tracks fit in the listed releases.
In an ideal world, you can just add the appropriate release on MusicBrainz and Picard will simply tag all your tracks correctly – done and dusted.
imdoingmypart.gif etc etc
But not all tracks belong on MusicBrainz. And not all albums exactly match the releases. If you’re me1, you have music that just isn’t on MB at all and never will be.
The issue comes from when some tracks in an album have been tagged previously by Picard, but others have not – because Picard leaves behind super secret custom tags to help organise music. Which is great, except that MPD and MALP can read these custom tags and if not all the tracks in an album having matching ones, weirdness ensues.
So I downloaded this thing, which does a very specific job, but I used it solely to view “extended tags” and delete all the MB related stuff for albums with a mixed tagging history.
Step Three – Disc numbers?
If some of your album’s tracks have been tagged “disc 1/1” or similar and some have nothing in that tag – these tracks will still appear on one album, but the order may be all wrong. Just make your tags consistent – either all disc 1/1 or no data in those tags.
Empty tags for this can be intepreted as “disc 0”, causing those tracks to be erroneously listed prior to others.
That’s all I have so far, I’ll update with screenshot examples later.
With the advent of the Raspberry Pi 3 and Zero W, newer Pi-s come with wireless baked-in, which is (IMHO) a welcome addition to help make setting up a Pi without Ethernet much more straightforward.
In fact, given my employer’s aggressively antisocial wireless network 2, it has become the norm for me (and my students) to set up a fresh Raspbian install using either a mobile hotspot or by tethering their phones. In neither case is Ethernet a useful option3.
“Headless” installs are setups which do not require a keyboard, mouse and monitor – given the ubiquity of networking and the low-power of Pi-like devices, it makes sense to be able to use an SSH session to do all your setup and get your device running without the hassle of directly using I/O in front of it. Plus, all the reference sites you’re using are probably open in the hundred or so tabs on your main computer4.
Without further rambling, here is the current easiest way to set up a Raspbian Buster install to be headless, using MacOS as the host machine:
Write your image to a micro SD card. I am lazy and use Balena Etcher rather than DD, although at the time of writing, it’s a little broken when used with MacOS Catalina.
Remove your SD card and pop it back in. Do not boot your Pi with it at this stage. You need to make these changes for the first boot or Raspbian will ignore them.
It should appear mounted as “boot”. This is the only section of the new filesystem you can read and write on the host machine.
Open a terminal, because we’re all adults here and GUIs are only for circumventing the DD command using Balena Etcher.
Change directory to the boot partition on the card and create a file called “ssh”:
That’s it – you can eject your card safely6, pop it in your Pi and power up.
Some additional notes, for fun and profit:
Q. How do I find the IP of my Pi after it boots, so that I can SSH in? A. If you’re using an Android phone to hotspot – you can find a list of connected devices in the settings along with each of their IPs. If you’re using a mobile hotspot or home router, log in to its web interface to view connected devices or get your phone to connect to the network use a network scanning tool such as Fing. If you’re using an iPhone to hotspot – umm. I don’t know. Last I checked, they tell you how many devices are connected, but not any details about them (thanks Apple! I hate it!) and Fing doesn’t return details when it’s run on the hotspot itself. Arp has decidedly mixed results. There is apparently an app that can be downloaded to show you details of devices connected to your iPhone.
Q. Isn’t there other info I should include in my wpa_supplicant config? Like the country code? A. Probably. It works fine for me without country code and I’m all for minimising the content that has to be customised in a config. Perhaps AU and UK wireless devices just interconnect fine, or perhaps some other WiFi voodoo has done away with the need for CCs. If you’re in the US, does it not work without a country code? I do know that in a previous version of Raspbian (Jessie, perhaps?), the Pi would refuse to connect if CC wasn’t set, so do with that what you will. UPDATE IN 2020: You absolutely do need to set the country code, especially if you’re using the 5GHz bands. Recent RPi OS builds seem to enforce this again. I’ve included the AU code in the example above (since I’m in AU), but you’ll need to set yours as per this list.
Q. I have to put my password in a config in plain text. What gives? A. You don’t have to. There are ways to hash it and store it in the config. Here’s the thing though – I’m betting this WiFi password is either a home network or a hotspot – and in either case, it’s a shared key in the literal sense of the term – lots of people know it, and it’s trivially easy to change it (at least on the router). If you’re setting this up on a corporate network, my little config above won’t get you connected anyway. I’ve made it work in the past, but mobile devices I’ve connected to our corporate network have been… idiosyncratic. They lose Internet access or randomly change IP or need to be power cycled with a 15 minute delay every day. In short, I haven’t found Raspbian, or even many Linux distros that are cooperative with (what is probably a poorly configured) corporate WiFi, so in this day and age, it’s easier just to work around it rather than try to join it. :-/
I never learned to code with Python; my first forays into development were with batch files (I kid you not) and then Visual Basic (which taught me many things I spent years unlearning).
Python is, in many respects, a great language for learners (which I’m not going to discuss today).
There is however, a great deal of… less than intuitive show-off code that can be, nay is encouraged to be, written using the language. Solutions are deemed to be “Pythonic”, a term as nebulous as “elegant” and often resulting in code just as unreadable to the casual observer or Python learner.
In some respects, this is about reducing the number of lines written – something fraught with peril for someone new to coding.
But there is a seductive element to Pythonic solutions – they don’t require you to twist yourself up in lines of boilerplate just to overcome a (often commonly encountered) problem.
The “with” keyword is not especially unique to Python, but is actively encouraged, and with good reason. This is one case where fewer lines is definitely better. Continue Reading…
When you submit assignments, you should submit them in PDF, not Word format.
There are a few reasons why, but the main two are as follows:
You can be more sure that your tutor or lecturer will see the same thing you submitted
Word documents can display differently depending on the version or device used.
This is far less of an issue with PDF.
You can’t accidentally munge your keyboard and change the final document.
Probably not normally a consideration, but after 9 hours staring at papers on the significance of First Name Consonant Frequency in Childhood Misbehaviour*, you can easily make silly mistakes and be completely unaware that you just moved a crucial paragraph and are now submitting the antithesis of your intended argument.
I’ve never had cause to use executemany before, so perhaps it is unfortunate that my first encounter be in the context of oursql’s somewhat anaemic documentation.
I’ve just spent well over an hour trying to get a simple executemany statement to work – in retrospect, the solution was obvious. But the presence of an example (just one!) would have made things immediately clear.
To that end:
reportDB = oursql.connect(host = "localhost",
                          user = "LapsedPacifist",
                          passwd = "ContentsMayDiffer",
                          db = "AnythingLegalConsidered")

with reportDB as query:
  query.execute("BEGIN")
  query.execute("""
                INSERT INTO assets(clientid, assettype, model, deployed, name)
                VALUES(?, ?, ?, ?, ?)
                """, (clientID, ASSET_TYPE_UNKNOWN, model, deployed, name))

  assetID = query.lastrowid
  addresses = []

  for ip in ips:
    addresses.append([assetID, ip])

  query.executemany("""
                    INSERT INTO asset_ips(assetid, ipv4address)
                    VALUES (?, ?)
                    """, (addresses))
That’s it – just as oursql’s parameterisation is looking for a list of parameters, executemany is looking for a list of parameter lists – not just a list of strings.
Hence the for loop creating a list with the two parameters and then appending it to the executemany parameter list.
I’m sure there’s a better, more pythonic way of doing that – please let me know if I’m missing something obvious.
And behold, the grand total of what oursql’s documentation has to say about executemany:
Additionally, executemany() is lazy; if passed a generator or any other iterator which does produces values lazily, values will only be taken from the iterator immediately before they are sent to the database.
executemany(query, parambatch)
Execute the same query with different sets of parameters. This is more efficient than calling execute many times with the same query.
I don’t want it to sound like I’m down on oursql – I feel it’s the superior library for MySQL in Python, and it’s still quite young – but this particular gap in the documentation had me pulling out my hair.
I’ve read some complaints regardingscalability of executemany in oursql – fortunately my code won’t ever have to handle huge numbers of queries at one time.
Sometimes it’s necessary to do things the wrong way.
Plinkmiscuous is the world’s tiniest, laziest modification to the very excellent Plink, part of the PuTTY suite of software.
Plink is a command line only connection tool – it has much of the core functionality of PuTTY without all the fruit of a window and GUI. It’s often necessary to connect through to *nix servers from Windows programmatically, and Plink is generally the tool for the job.
Unless you have a scenario where you can’t know the SSH fingerprint of the server to which you are connecting, or can’t store it (PuTTY puts things in the registry – I’m assuming a hangover from the bad old days of XP) for the account you need to run as.
In these circumstances, the otherwise fully automated Plink demands user interaction to confirm the fingerprint as OK.
Obviously, this is by design – the whole point of SSH is that you can be sure the server you’re connecting to is indeed the one you want before you start sending over authentication details.
But sometimes, security be damned, you need to do something dirty. Please don’t ever do it in a serious or production system.
Plink is open source, so that means we can modify it when it fails to do what we want.
So that’s what I’ve done – it was a change of exactly 1 byte (and some Visual Studio fru fru).
You can find Plinkmiscuous on the software page. It’s based on the current version of Plink at the time of writing. I can update it in the future, but make no promises (and the code change is so simple, you should do it yourself).
And it’s probably worth rethinking whatever it is you’re planning to do with Plinkmiscuous so you don’t have to use it. :-P