However, that driver clobbers the in-built wireless Xbox 360 controller support – immediately our old Xbox 360 controller stopped working along with the two different 8BitDo Ultimate and Ultimate 2.
I could get the 8BitDo controllers to work by disconnecting their receivers and instead connecting via bluetooth. However, support on bluetooth was iffy and connectivity was a spotty – often requiring a reconnection each time we wanted to use them.
I ended up moving the Xbox controller to bluetooth and removing the Xone driver, keeping the 8BitDo controllers on 2.4GHz.
But then my son “needed” a headset (or, in fact, needed to stop borrowing my wife’s headset).
Options were:
Long USB cable headset (Expensive-ish, inconvenient)
I’ve recently (~6 weeks ago) replaced the very janky MPD server setup in my kitchen with a smaller Raspberry Pi 3B + DAC hat.
When I’ve attempted to run this setup in the past, it’s worked fine for maybe a week and then I’ve had network response issues – the CPU seems okay, but network connectivity is so bad, I can’t even SSH or send through an MPC stop command.
I originally figured that the issue here was weak WiFi on the Pi + weak WiFi access point and left it at that – since I seemed not to get the issue when I moved the pi into my office and connected via Ethernet.
However, I have a shiny new WiFi AP now, which has much better range and reliability, so I figured I’d give the Pi a go again – no fan, lower power usage, quiet.
Worked great! Until yesterday.
Yesterday we had a power outage. I still haven’t configured my media devices to retry NAS connections after power outages, so they often need to be re-rebooted when this happens so that they can access media libraries. This was the case with the Pi.
When it came back up, MPD was accessible but… slow again. And then songs would stutter out or controls would be unresponsive. SSH struggled to connect.
It was the old set of problems all over again.
But why?
I tried:
1) Completely unplugging the Pi and its PSU and leaving them before plugging back in – capacitors are sinister majicks, so maybe this was related to the power outage? 2) Updating the system 3) Disabling the GUI on startup (may have already been that way) 4) Checking for undervoltage messages in dmesg (none) 5) Checking wifi connectivity (iwconfig wlan0 – 64/70, no signal issues) 6) Swearing
None of these worked. Time for bed.
Upon investigating this morning, I had two “finds”, both from the mpd.log file: *Lots of “alsa_output: Decoder is too slow; playing silence to avoid xrun” *Lots of “zeroconf: No global port, disabling zeroconf”
Both these messages appeared AFTER the day of the outage but not before (except one zeroconf a few days earlier – but not 5 within a few minutes like I was receiving after)
I found a few threads similar to this one which suggested the zeroconf issue was systemd related – the “fix” suggested there did not help me.
(Also: I’d been using systemd since day one and not had this issue)
Searches relating to the “decoder too slow” message yielded little; my CPU was never the issue and my wifi connection was solid.
I tried changing the MPD config to include these settings for my output, per some suggestions:
buffer_time “200000” period_time “5084”
This did nothing.
The zeroconf issue puzzled me; I don’t need or use it, but had never had these errors before. Couldn’t I just disable it? At least that’s one fewer error to confound me.
In the mpd.conf file, you can find a line enabling/disabling zeroconf: zeroconf_enabled “no”
This… fixed it?
It doesn’t make a lot of sense.
My current hypothesis is that actually there is some deeper problem causing this issue and zeroconf failing was exacerbating it – my MPD client is still a bit sluggish, but not unresponsive like before.
I have no idea why this happened or if it is related to the power outage or if something updated and broke things. I’ll leave it for now and see how it goes.
Our house received an upgrade to full fibre optic last year, and with the increase in available home bandwidth came the opportunity to retire our old NetComm router/modem/WiFi unit, which had been, if we’re generous, “adequate”.
Or, in fact, inadequate in a number of ways – its WiFi range was actually abysmal, something I only found out when I migrated to a dedicated WiFi unit and discovered that a single device can actually cover our entire property.
Also, it “supported” IPv6, in the sense that it could, technically, have an IPv6 address for a brief period of time, before just quietly giving up on routing IPv6 traffic until you either reboot or get exasperated and switch off IPv6 support.
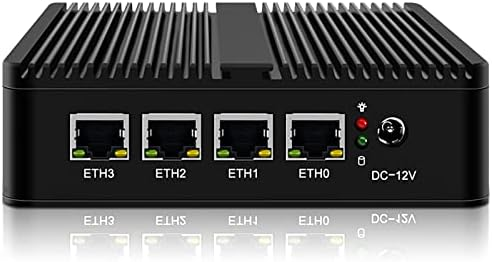
So in the spirit of questionable decisions, and egged on by friends who are far more skilled and experienced in this sort of thing, I purchased a cheap all-in-one fanless PC with four 2.5Gb ethernet ports.
In this house, we enumerate from zero
For the curious, it runs at around 55 degrees in the Australian summer, 65 if I make the CPU think hard. Certainly an improvement over the poor old Mac mini I have running as an MPD server in our kitchen, which routinely idles at 80 degrees.
Because I can’t ever be content to do things the easy way, I put Proxmox on it first, with the intention of running OPNsense as a VM, alongside a PiHole instance.
My initial set up experience was tainted by an inability to get OPNsense to register a connection via the WAN port, which resulted in around 45 minutes of frustration before realising that my ISP requires me to manually “kick” connections between router changes. As a result of this faffing about, I now at least have a document detailing exactly what each of the physical ethernet ports are called in Proxmox and what their MAC addresses are – probably something I should have sorted out before doing anything else anyway.
Once the router had a connection, everything ran great. For thirty minutes. After which, the router simply couldn’t talk to the gateway any more. No Internet connection.
In OPNsense’s dashboard, it indicated that EVERYTHING IS FINE. Which, you know, not true.
This is a lie.
A reboot results in the same behaviour – everything is fine for around half an hour, then no WAN connectivity. Renewing the WAN connection fixes things… indefinitely. Until another reboot.
Thus began The Troubleshooting.
Various settings and configs were checked. IPv6 disabled (just in case), hardware VLAN filtering disabled etc etc
Same behaviour.
Install a completely fresh OPNSense VM – exact. same. behaviour.
And the whole time – once I renew the WAN connection, it fixes itself for as long as it remains up. The command I ended up running in the shell:
configctl interface reconfigure wan
Magically fixed it… but only if it had already broken. That is, I couldn’t just run a renew at the end of the boot sequence and call it a day – I had to wait until the WAN connection failed before I could renew it – and that just didn’t fly (not that appending some magic words to a startup script would have made me happy).
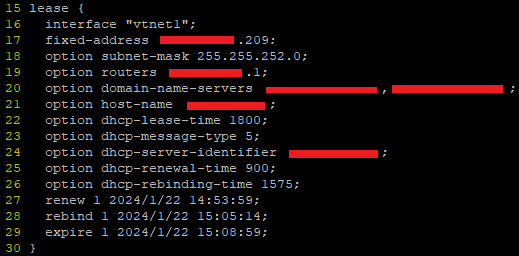
I ended up digging through the DHCP client leases file in /var/db (in my case dhclient.leases.vtnet1) and noticing some strange overlaps in the renewal/rebind/expiry etc times.
These leases files look like this:
Turns out, this a log, rather than a config – FreeBSD is writing the dates and times there as a record, not an instruction. But this was the clue to help figure it out – when router first booted, the lease file was written to but the time for renewal and expiry passed without the router even trying to renew the connection.
Once I reran the renewal command manually, it worked fine, but crucially, it was writing dates and times that were wildly different to the initial time on bootup.
Anyway, as with all things, it was DNS.
A haiku
Well, sort of.
When I set up the initial Proxmox install, I somehow (?) managed to set its DNS server to be 127.0.0.1. Surely that can’t have been the default?
Anyway, that meant that while it could do all the work of creating VMs just fine, it couldn’t, among other things, talk to NTP servers to figure out the time.
But it did know it was in the UTC+8 timezone. And it did assume that the hardware clock was in UTC time. Which it wasn’t. It was set to local time. So my VM host believed it was 8 hours ahead of when it actually was.
When my router booted up, it was given this time and it then obtained a lease and made a note to renew that lease in 15 minutes. 30 minutes, tops.
But it then used an actual DNS server to do an NTP lookup for the correct time – at which point it said to itself, “hoo boy, I am 8 hours ahead of where I should be! Lemme just fix that right up.” But its lease now thinks the expiry is not for another 8 hours – hence failing to renew and not having any WAN connectivity.
To add to the confusion with all this – FreeBSD in all its wisdom writes dates and times to the lease file in universal coordinated time – not local time – without any indication that this is what it is doing. So when the router first obtained that lease and wrote the wrong time to the log, it looked to me like the correct time, but when I renewed the lease manually, it had corrected its own time and was now logging, what appeared to me to be 8 hours in the past.
Obviously, I think everything should always just be in UTC and that there are no problems or issues that would or could be caused by adopting a world free of timezones, but, please, indicate that somewhere, hey?
Anyway, OPNSense seems fine and good. I’ve managed to do some port forwarding and set up queues to minimise bufferbloat, so all is right with the world.
Perhaps you, like me, use an MPD server to manage and play a largish music collection. Perhaps, you, like me, are finding the odd weird thing happening in your client where multiple albums appear for the same set of tracks, or tracks are split between two different, yet somehow identical albums.
Probably not though. However, this post exists to provide me with a reminder of the techniques used to resolve those issues.
Before we begin, my primary client for this library is MALP on Android – it’s actually very good, but gets grumpy if your MPD is old (FWIW mine is 0.22 – I went to the trouble of compiling by hand) and is very strict about some tags (which is a Good Thing, but can be fiddly)
Step One – Basic Tag Hygiene
Make sure the tracks for your album all have ID3v2 tags (remove all the v1 tags – don’t need ’em) and that the track numbers, total tracks, artist, albumartist and album tags are all correctly set. Any variations here can cause issues where a track magically belongs to a different album with the same name, or lives on two different albums somehow
Step Two – Check for MusicBrainz Tags
The MusicBrainz project and its tagger – Picard – are wonderful. However, music releases are squirrely and it can be hard to pin down exactly where your tracks fit in the listed releases.
In an ideal world, you can just add the appropriate release on MusicBrainz and Picard will simply tag all your tracks correctly – done and dusted.
imdoingmypart.gif etc etc
But not all tracks belong on MusicBrainz. And not all albums exactly match the releases. If you’re me1, you have music that just isn’t on MB at all and never will be.
The issue comes from when some tracks in an album have been tagged previously by Picard, but others have not – because Picard leaves behind super secret custom tags to help organise music. Which is great, except that MPD and MALP can read these custom tags and if not all the tracks in an album having matching ones, weirdness ensues.
So I downloaded this thing, which does a very specific job, but I used it solely to view “extended tags” and delete all the MB related stuff for albums with a mixed tagging history.
Step Three – Disc numbers?
If some of your album’s tracks have been tagged “disc 1/1” or similar and some have nothing in that tag – these tracks will still appear on one album, but the order may be all wrong. Just make your tags consistent – either all disc 1/1 or no data in those tags.
Empty tags for this can be intepreted as “disc 0”, causing those tracks to be erroneously listed prior to others.
That’s all I have so far, I’ll update with screenshot examples later.
So I’ve been getting emails from Let’sEncrypt telling me that my certs are coming in through the old ACME v1 protocol and that if I wish to continue receiving certificates, I need to update my certbot.
I figured this was just because the Ubuntu version I had been running was a little on the old side and was no longer receiving non-security updates, prompting me to update to Bionic (v18).
But the emails kept coming, and it became apparent that the version of certbot I had was woefully out of date (0.31 vs 1.3.0).
And yet… the EFF’s website containing guidance for getting certbot up and running on various systems still provides a guide for installing using the PPA. There is a justification for doing so, but as of June 2020, the software installed via PPA will be useless, so I’m not entirely sure why it’s still the recommended method 2 months out.
At any rate, here’s what I did to update mine in order to continue working with my hosting software:
That ain’t all though. This worked fine on my main server, but the secondary server threw an error:
/usr/local/bin/certbot-auto --help
Requesting to rerun /usr/local/bin/certbot-auto with root privileges...
Creating virtual environment...
Traceback (most recent call last):
  File "<stdin>", line 27, in <module>
  File "<stdin>", line 19, in create_venv
  File "/usr/lib/python2.7/subprocess.py", line 185, in check_call
    retcode = call(*popenargs, **kwargs)
  File "/usr/lib/python2.7/subprocess.py", line 172, in call
    return Popen(*popenargs, **kwargs).wait()
  File "/usr/lib/python2.7/subprocess.py", line 394, in __init__
    errread, errwrite)
  File "/usr/lib/python2.7/subprocess.py", line 1047, in _execute_child
    raise child_exception
OSError: [Errno 2] No such file or directory
Turns out, that “no such file or directory” came from the fact I’d never used virtual environments on the secondary server.
Running certbot with the –version arg should then show you a current version.
I’m surprised at how little support the deb based systems are getting from the certbot crew – I’ve been otherwise impressed with Let’sEncrypt’s work thus far.
With the advent of the Raspberry Pi 3 and Zero W, newer Pi-s come with wireless baked-in, which is (IMHO) a welcome addition to help make setting up a Pi without Ethernet much more straightforward.
In fact, given my employer’s aggressively antisocial wireless network 2, it has become the norm for me (and my students) to set up a fresh Raspbian install using either a mobile hotspot or by tethering their phones. In neither case is Ethernet a useful option3.
“Headless” installs are setups which do not require a keyboard, mouse and monitor – given the ubiquity of networking and the low-power of Pi-like devices, it makes sense to be able to use an SSH session to do all your setup and get your device running without the hassle of directly using I/O in front of it. Plus, all the reference sites you’re using are probably open in the hundred or so tabs on your main computer4.
Without further rambling, here is the current easiest way to set up a Raspbian Buster install to be headless, using MacOS as the host machine:
Write your image to a micro SD card. I am lazy and use Balena Etcher rather than DD, although at the time of writing, it’s a little broken when used with MacOS Catalina.
Remove your SD card and pop it back in. Do not boot your Pi with it at this stage. You need to make these changes for the first boot or Raspbian will ignore them.
It should appear mounted as “boot”. This is the only section of the new filesystem you can read and write on the host machine.
Open a terminal, because we’re all adults here and GUIs are only for circumventing the DD command using Balena Etcher.
Change directory to the boot partition on the card and create a file called “ssh”:
That’s it – you can eject your card safely6, pop it in your Pi and power up.
Some additional notes, for fun and profit:
Q. How do I find the IP of my Pi after it boots, so that I can SSH in? A. If you’re using an Android phone to hotspot – you can find a list of connected devices in the settings along with each of their IPs. If you’re using a mobile hotspot or home router, log in to its web interface to view connected devices or get your phone to connect to the network use a network scanning tool such as Fing. If you’re using an iPhone to hotspot – umm. I don’t know. Last I checked, they tell you how many devices are connected, but not any details about them (thanks Apple! I hate it!) and Fing doesn’t return details when it’s run on the hotspot itself. Arp has decidedly mixed results. There is apparently an app that can be downloaded to show you details of devices connected to your iPhone.
Q. Isn’t there other info I should include in my wpa_supplicant config? Like the country code? A. Probably. It works fine for me without country code and I’m all for minimising the content that has to be customised in a config. Perhaps AU and UK wireless devices just interconnect fine, or perhaps some other WiFi voodoo has done away with the need for CCs. If you’re in the US, does it not work without a country code? I do know that in a previous version of Raspbian (Jessie, perhaps?), the Pi would refuse to connect if CC wasn’t set, so do with that what you will. UPDATE IN 2020: You absolutely do need to set the country code, especially if you’re using the 5GHz bands. Recent RPi OS builds seem to enforce this again. I’ve included the AU code in the example above (since I’m in AU), but you’ll need to set yours as per this list.
Q. I have to put my password in a config in plain text. What gives? A. You don’t have to. There are ways to hash it and store it in the config. Here’s the thing though – I’m betting this WiFi password is either a home network or a hotspot – and in either case, it’s a shared key in the literal sense of the term – lots of people know it, and it’s trivially easy to change it (at least on the router). If you’re setting this up on a corporate network, my little config above won’t get you connected anyway. I’ve made it work in the past, but mobile devices I’ve connected to our corporate network have been… idiosyncratic. They lose Internet access or randomly change IP or need to be power cycled with a 15 minute delay every day. In short, I haven’t found Raspbian, or even many Linux distros that are cooperative with (what is probably a poorly configured) corporate WiFi, so in this day and age, it’s easier just to work around it rather than try to join it. :-/
Some of my students have access to hardware for their projects and experiments, including various Raspberry Pi-s and alternative 7 operating systems and accessories.
Unfortunately, given the way the Pi interacts with HATs 8 and other similar devices via GPIO 9 pins, there is always the possibility that 5V will go where it shouldn’t and damage will be done.
In the case of the official Raspberry Pi Touchscreen Display, the device can be wired up to either receive or provide power to the Pi via jumper cables through the GPIO pins or provide power to the Pi via an included USB A port in the more “traditional” way.
When it comes to hobbyist hardware (and software!) there is an impetus to err on the side of giving the user as many options as possible.
When it comes to custom wiring, I think Murphy’s Law 10 should take precedence over hobbyist convenience. In other words, don’t even give us the option to power it via a method that will release magic smoke if done wrong.
There is some value in allowing users to power the Pi using the pins – and indeed this appears to be encouraged, as the enclosure that ships with the display only provides access to the Pi usb port.
At any rate, multiple options are available and inevitably, one of my students has configured one of the options that puts power where power should not go. As a result, neither the Pi nor the display are giving me any joy now when wired correctly.
It would seem that the Pi is beyond redemption – there is no display via HDMI and the SD card reader is unable to read cards.
The display is a happier story – there is no possibility to push power to or from it via the pins, but it seems perfectly happy to power on and pass power through via the USB port.
So just a quick note to anyone in a similar position – try your “dead” display with another (known working) Pi using the USB ports to provide power to both and you might find the display still has life yet.
With my server installs, that’ll let you use the up and down arrows to go back and forth through your history as usual, but if you start to type a command it’ll only go through the commands in your history that match what you’ve typed so far.
I find this behaviour to be really intuitive, to the point that it’s frustrating to use terminals without it.
It took some experimenting to find the solution, but in Ubuntu Desktop, the right file to edit is .bashrc and the lines are a little different – explicitly binding the functionality of the keys:
If you’re stuck behind a school or university firewall, you’ll often find that they’re unreasonably restrictive (as a user – as an administrator, well actually, most of the admins probably think it’s a bit over the top too, given it really doesn’t stop much untoward behaviour for the inconvenience caused).
As long as you want web traffic to sites that haven’t been blacklisted or have restricted keywords in the URL (sigh), you’ll be fine. But if, for example, you need SSH access to a *nix server offsite, you’re stuck using various web based SSH console solutions.
As always, there are a variety of ways around it: some more complex than others. But a good place to start is the fact that most corporate firewalls are not only unreasonably restrictive – they’re also lazy.
Port 443 is used for secure web traffic, and the firewall can’t really do much to inspect the back-and-forth through that port (you know, by design), so in many cases, they just let traffic through without even bothering to check that it’s actually HTTPS.
I mean, really. If someone is trying to get access through port 22, they can probably figure out how to achieve the same end through 443 (this post, case-in-point).
Enter the demultiplexers – software tools to simply listen on 443 and direct SSH traffic to sshd and HTTPS traffic to httpd (the two kinds of traffic are trivially and flawlessly distinguishable).
In preparation for the upgrade from XS6.2 to 6.5 at my day job, I’m removing the XenTools drivers/software from our VMs (apparently old versions of the tools can cause booting issues for Windows VMs at the very least).
Something I hadn’t realised – removing the XenTools suite will cause Windows to lose its network drivers and revert to network defaults (which I guess should have been obvious? Not sure.).
Network defaults being DHCP for IP address, meaning our VM server just got assigned a client IP and for all intents and purposes couldn’t be found by the client software on our actual client machines.
Not a big deal or a hard fix in the end (VM reboot -> manually assign IPs again), but a reminder to self that this whole upgrade process will be a painful in both expected and unexpected ways.
Update:
The actual upgrade went well. Larger orgs usually have a physical server pool and upgrade using something called “rolling pool upgrades”.
We don’t have this, we’re poor. As a result, we have one main server with heaps of RAM and a second, backup server with enough resources to run essential VMs.
In the event of disaster, we can recover a VM image to the backup and pick up where we left off until a replacement main server is arranged.
So no rolling upgrades for us – instead I just prepped the VM images (as above) and then upgraded the backup server first (which, in case you’re wondering involves rebooting the physical server and running the installer from the ISO – either a USB or CD, of all things, and just selecting “upgrade” rather than “install and destroy all my stuff forever”) to verify everything would be running okay.
Once we were sure the backup could run our images on 6.5, we then processed the main server.
The whole process was significantly faster than the preparation, and there were no issues. Very impressed.
6.5 doesn’t do a heck of a lot for us overtly (although I’m quietly upgrading our Ubuntu VMs to 14.04), but there are a slew of improvements and I’m not sure whether it’s a coincidence or not, but our SVN/Dev/Local DB server is no longer having weird reboot issues.