Headless Raspberry Pi – Circa 2019

With the advent of the Raspberry Pi 3 and Zero W, newer Pi-s come with wireless baked-in, which is (IMHO) a welcome addition to help make setting up a Pi without Ethernet much more straightforward.

In fact, given my employer’s aggressively antisocial wireless network 1, it has become the norm for me (and my students) to set up a fresh Raspbian install using either a mobile hotspot or by tethering their phones. In neither case is Ethernet a useful option2.

“Headless” installs are setups which do not require a keyboard, mouse and monitor – given the ubiquity of networking and the low-power of Pi-like devices, it makes sense to be able to use an SSH session to do all your setup and get your device running without the hassle of directly using I/O in front of it. Plus, all the reference sites you’re using are probably open in the hundred or so tabs on your main computer3.

Without further rambling, here is the current easiest way to set up a Raspbian Buster install to be headless, using MacOS as the host machine:

  • Write your image to a micro SD card. I am lazy and use Balena Etcher rather than DD, although at the time of writing, it’s a little broken when used with MacOS Catalina.
  • Remove your SD card and pop it back in. Do not boot your Pi with it at this stage. You need to make these changes for the first boot or Raspbian will ignore them.
  • It should appear mounted as “boot”. This is the only section of the new filesystem you can read and write on the host machine.
  • Open a terminal, because we’re all adults here and GUIs are only for circumventing the DD command using Balena Etcher.
  • Change directory to the boot partition on the card and create a file called “ssh”:
cd /Volumes/boot
touch ssh
  • edit a new file called “wpa_supplicant.conf”4
nano wpa_supplicant.conf

Put this content in it, replacing the placeholders in quotes (but keep the quotes) with bits relevant to you:

update_config=1
country=AU
ctrl_interface=/var/run/wpa_supplicant

network={
 scan_ssid=1
 ssid="Your Network Name"
 psk="Your Network Password"
}

That’s it – you can eject your card safely5, pop it in your Pi and power up.

Some additional notes, for fun and profit:

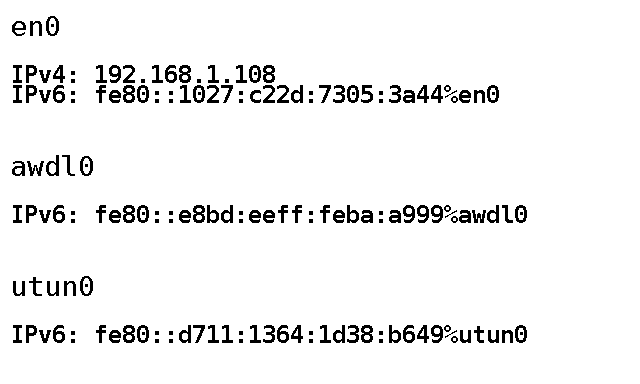
Q. How do I find the IP of my Pi after it boots, so that I can SSH in?
A. If you’re using an Android phone to hotspot – you can find a list of connected devices in the settings along with each of their IPs.
If you’re using a mobile hotspot or home router, log in to its web interface to view connected devices or get your phone to connect to the network use a network scanning tool such as Fing.
If you’re using an iPhone to hotspot – umm. I don’t know. Last I checked, they tell you how many devices are connected, but not any details about them (thanks Apple! I hate it!) and Fing doesn’t return details when it’s run on the hotspot itself. Arp has decidedly mixed results. There is apparently an app that can be downloaded to show you details of devices connected to your iPhone.

Q. Isn’t there other info I should include in my wpa_supplicant config? Like the country code?
A. Probably. It works fine for me without country code and I’m all for minimising the content that has to be customised in a config. Perhaps AU and UK wireless devices just interconnect fine, or perhaps some other WiFi voodoo has done away with the need for CCs. If you’re in the US, does it not work without a country code? I do know that in a previous version of Raspbian (Jessie, perhaps?), the Pi would refuse to connect if CC wasn’t set, so do with that what you will.
UPDATE IN 2020:
You absolutely do need to set the country code, especially if you’re using the 5GHz bands. Recent RPi OS builds seem to enforce this again. I’ve included the AU code in the example above (since I’m in AU), but you’ll need to set yours as per this list.

Q. I have to put my password in a config in plain text. What gives?
A. You don’t have to. There are ways to hash it and store it in the config.
Here’s the thing though – I’m betting this WiFi password is either a home network or a hotspot – and in either case, it’s a shared key in the literal sense of the term – lots of people know it, and it’s trivially easy to change it (at least on the router).
If you’re setting this up on a corporate network, my little config above won’t get you connected anyway. I’ve made it work in the past, but mobile devices I’ve connected to our corporate network have been… idiosyncratic. They lose Internet access or randomly change IP or need to be power cycled with a 15 minute delay every day. In short, I haven’t found Raspbian, or even many Linux distros that are cooperative with (what is probably a poorly configured) corporate WiFi, so in this day and age, it’s easier just to work around it rather than try to join it. :-/

Micro:bit as a game controller

The Goal

My aim was originally to set up a Micro:bit as a Bluetooth HID6, but it turns out that’s beyond my ken.

My initial attempts were using C++ or PXT as per these projects:

PXT Bluetooth Keyboard
BLE HID Keyboard Stream Demo

The first indicates that it will sync with MacOS and work with Android. I could only get a brief sync with MacOS sometimes and while it synced with Android, I couldn’t get any keystrokes to show up.

The second briefly showed up as a possible pairing device, but beyond that I got no joy. It doesn’t help that I couldn’t understand just about any of the code.

Revising Expectations

Okay, this is beyond my abilities at the moment. But there’s a cheaty way – based on the concepts used in this project.

Sam El-Husseini’s project uses three easy to implement components:

  1. Pushing data to the serial bus (USB) from the Micro:bit when a button is pressed
  2. A listener program on the host device that turns the data from serial into actions on the host
  3. A second/more Micro:bits that send Bluetooth messages to the first device – in this way, it would act as a proxy (basically a proprietary dongle).

Component 3 is compelling, because implementing Bluetooth communication between Micro:bits is almost comically easy in the interpreted languages (such as Python, Javascript etc). I imagine its probably significantly easier to implement in C++ than proper BT pairing too, but I’ll cross that bridge when I’m good and ready.

Part 1 – Proof-of-Concept Tethered Device

I decided to implement the first two components and leave the third for another time 7.

The tethered MB uses very similar code to Sam’s project above:

Javascript is spawned from the third circle of hell, but I’ll be damned if it isn’t easy to use in this case
basic.forever(function () {
    if (input.buttonIsPressed(Button.A)) {
        serial.writeNumber(1)
    }
    if (input.buttonIsPressed(Button.B)) {
        serial.writeNumber(2)
    }
    if (!(input.buttonIsPressed(Button.A)) && !(input.buttonIsPressed(Button.B))) {
        serial.writeNumber(0)
    }
})

The only modification here is to send a stream of numbers rather than linefeed delimited strings8.

The third if statement is to work with the key events that the host program needs to implement – if we’re just typing, sending the keystrokes in isolation is fine, but we need to indicate when a key is pressed and when it should be released. The 1s and 2s indicate when A and B are pressed respectively. The 0s indicate that nothing is being pressed. Is it bad and naughty that I’m sending a constant stream of zeros when nothing is happening? I’ll fix it in the first beta/third production patch.

I’ve never used Node before, so I had a go at using Node as per Sam’s project. It works great for his purposes because there’s a specific Node module for integration with Spotify. I needed something more general-purpose. The only two modules I could find were a keyboard simulator that is a wrapper for a JAR file and requires full-blown Java VM and robot JS which is also pretty big for my needs, but hey, let’s give the robot a go.

The issue with robot is that it implements a function called “keyTap”, which, well, taps a key. If you’ve ever watched someone use a controller, they ain’t sittin’ there tapping the buttons, they’re pressing and holding most of the time.

No dice. Back to Python.

Part 2 – Host Program

import serial
from pynput.keyboard import Key, Controller
ser = serial.Serial('/dev/tty.usbmodem14202', 115200)

keyboard = Controller()

last = 0

while 1:
  serial_line = int(ser.read())
  if serial_line != 0:
    last = 1
    if serial_line == 1:
      keyboard.press('a')
    elif serial_line == 2:
      keyboard.press('d')
  elif last != 0:
    keyboard.release('a')
    keyboard.release('d')
    last = 0

Python provides two modules for our purposes: serial and pynput.

Pynput gives us much finer control over keyboard simulation – pressing and holding and releasing keys, among other functions.

There’s really not a lot to the host program – it’s surprisingly simple. The one point to note is the use of the “last” variable.

During testing, I noticed that the host program was blocking normal keyboard input – this is because the constant stream of 0s was causing it to continuously trigger key releases for the related keys, rendering the keyboard useless for those keys. The use of a test for whether or not the release command has been sent removes that unintended side effect. I investigated putting similar code into the Micro:bit program, but the nature of the byte stream meant that the 0s didn’t always register with the host program.

Any necessary improvements are indicated in the todo list below.

Proof of concept using a silly pygame Spider-man thing I made

Wait – what’s the point?

“But Jonathan,” you say, “What’s the point of a controller with only two buttons? Even Tetris requires at least four!”

Ah, you’re forgetting about… Tron:

14 years and still going strong…

Armagetron Advanced, to be exact. Played with just two buttons (unless you’re a coward who uses the brakes).

In all seriousness, the proof of concept is for a more ambitious project: Micro:bits can be easily connected to a breakout board which allows for a wide array of inputs, buttons etc to be connected to its IO pins.

In theory (and what I’d like to do with my video game design class) one could design the composition and layout of their own “ideal” controller and create a Micro:bit program to pipe commands to serial.

Laser cutting or 3D printing the necessary structure of the controller should be straightforward enough (we’re not shooting for aesthetic design awards). The end result is a custom controller powered by any Micro:bit.

Now that this proof of concept is complete, there’s a little more work to be done.

Todo List

  1. Test with compiled, rather than translated code on both the host and Micro:bit. It could have been my imagination, but it felt that the controller was a touch delayed, which would make sense given the pipeline from physical button to simulated keypress.
  2. Test with two Micro:bits – using the tethered MB as a dongle for the “wireless” one.
  3. Connect external physical buttons and joysticks to the MB IO pins. This process is well documented and I do not anticipate it to be particularly difficult9
  4. Investigate removing or mitigating the zero stream when the device is idle.
  5. Investigate using Bluetooth to connect as a direct serial device without pairing – no idea if possible or easy, but would allow a similar serial streaming process with the need for a dongle MB.
  6. Modify the host program to autodetect the appropriate port.
  7. Verify cross-platform compatibility (read: Windows).
  8. Modify host program to allow for a button to be held down while tapping another.
  9. Design and implement a physical casing for a customised controller.

Definitely a job to finish in 2019, but happy to have found this process so easy to do (in comparison to native Bluetooth pairing).

Paint IP on Epaper: RPi Startup

A picture of text. Well that's handy.

I’m currently playing around with one of these E-paper modules:

Epaper panel showing clock, weather and timetable

Panel displaying clock/timetable image

The panel is great for its price and ease of use – Waveshare ship this model with a Raspberry Pi hat and provide a number of software libraries for interacting with them.

I’ll follow this up with a breakdown on how I created my wall clock, but just quickly, a quibble with Raspberry Pi/headless systems in general:

My place of work has a… restrictive network when it comes to BYOD. It’s better than it used to be, but unless you can easily connect to an enterprise wifi network (difficult, but not impossible with the Pi) you’ll need to connect an ethernet cable (and not mention it to the techs). In either case, you’ll get an IP address. But you won’t be able to figure out what IP address without plugging in a display.

There is an opportunity with a display like this to work around this problem: run a program on start up to push the IP addresses of all network interfaces to the panel.

Without further ado, PaintIP, a small Python script that will get a list of IPs for your interfaces and paint them to the panel:

A picture of text. Well that's handy.

PaintIP running on a Mac, which seems kinda pointless

The “screenshot” pictured here is actually the image generated by the program which is then pushed to the panel.

It’s a minor thing, but sometimes the ability to bring your device in from home, plug it in and immediately know which IP to SSH to is a lifesaver.

Rejected (and hilarious) alternative:

A program which simply takes a screenshot of the primary console, munges it into the right resolution at 1 bit colour and paints the display every 6 seconds (why 6 seconds? because this particular panel has a 6 second refresh – not ideal, but mostly workable).

I actually made this abomination, based on a technique from this here blog post.

#!/bin/sh
snapscreenshot -c1 -x1 -12 > console.tga
convert console.tga -depth 1 -colors 2 -colorspace gray -resize 640 -negate -gravity center -extent 640x384 -sharpen 0x3.5 BMP3:console_bw.bmp
python curator.py console_bw.bmp

It literally just uses snapscreenshot and ImageMagick’s convert program to create the 1 bit image of appropriate resolution and then calls a Python script to display said image.

Could I have put all this in a single Python script? Probably, but it’d have system calls to run snapscreenshot and convert (Python’s ImageMagick libraries leave much to be desired) and honestly I just needed the thing working now.

Curator is a very basic script that takes an image as an argument and displays it on the E-Paper panel – barely a modification of Waveshare’s example script.

Still, there might be the odd time when it’ll be useful to see a shot of the console for debug purposes – nothing stopping someone from configuring a hardware button to run the console dump shellscript.

Oh, and there are a handful of ways to get a program running on startup with a Pi, but the one I ended up using is simply inserting it into rc.local.

A Little Representation of Data: Pixels & Numbers (Lesson the First)

In my standard-issue (non-specialist) Digital Technology classes, I’ve attempted to spruce up the Data Representation content in the course.

I found last year, we neglected poor old Data Rep and focussed a little too much on binary conversions – which led to confusion and distress among some students. 10

For reasons beyond my understanding or pay grade, Digital Technology is now taken one hour a week for the whole year. There are significant downsides to this timetabling 11, but one advantage is that the course content divides somewhat neatly into four terms and having five different classes allows me to refine my lessons and activities to a much finer degree than I could last year (with one class at a time).

For first term, I opted to focus solely on a pixel art activity that I have previously (somewhat optimistically) attempted to squeeze into a single lesson.

The activity essentially guides students through creating an image like this:

Hand drawn dolphin

Through to a numerical representation like this:

20200000000000000000000000000000000000000000000000000
00000000000000000000001100000000000000000101000000000
00000111001100000000000010000000100000000001000000000
10000000010010000000010000001000000000000100000001111
11001000010000000001011011000100000000001001101001000
00000000000001010000000000000000110100000000000000010
01000000000000000001010000000000000000001000000000000
000000000000000000000000000000000

The fast students will get to the stage of writing clear and simple English instructions to read the numbers and recreate the image (as pixel art), but in my 6-7 lessons, I only managed to get the majority of students performing the numerical conversions.

Lesson 1

(The first set of slides can be found here)

It would be remiss of me not to link to the excellent Digital Technologies Hub section on Data Representation in years 7/8.

The flow in DT hub is to cover representation in year 8 only, beginning with binary representation and moving to the way data is encoded and represented numerically.

In addition, my approach to teaching Data Representation is heavily influenced by the CS Unplugged activities collected as Everything is Numbers.

DT Hub’s resources are structured around the ACARA curriculum points which offer tremendous flexibility 12 so there’s no need to follow their suggested progression slavishly.

In WA, our curriculum body has restricted that flexibility somewhat – it is necessary to cover numerical data representation in year 7 before exploring binary representation in year 8.

Truth be told, the content works in any order and there are benefits to either – knowing that data is numbers prior to learning about binary numbers allows for context when it comes to hardware representation of numbers (switches, magnetic polarity etc) 13. Doing it in reverse gives a reason for the conversion of data into numbers.

All of this is to simply say that my efforts this time around began with the concept of “thinking” and the idea that computers think of everything as numbers – an attempt to prime students for the relevance of the exercises ahead.

We look at the idea of “abstract representation” – that symbols be a universally understood stand-in for physical objects or concepts (culminating in language itself, numbers etc), using an activity that I shamelessly stole from a PL with James and Bruce.

While this activity (slides 5-12) is not strictly necessary to teach the curriculum, there is value in making clear the fact that the way computers store abstract representations of our data is actually not such a weird concept, it’s something that we humans do too, and in a far less explicit manner.

The activity from slide 13 onwards is the real introduction to the process of converting a “natural” image 14 into pixels and ultimately numbers.

We begin by drawing a simple image of our choosing onto graph paper, ignoring where the grid lines are relative to our drawing15. There is an example of a simple picture on slide 15, but I like to draw directly onto the whiteboard with the grid projected to make the process clear.

Students are then to go around squares that encompass the outline of their image and decide, square by square if more than 50% of the square is their picture, or if it is the background. If more than 50% is covered by their picture, they must colour in entire square, if not, the square is left blank.

It is important for students to realise that pixels are an either/or thing (or, in fact, a binary thing) – they may not partially shade a square. If they are unconvinced, have them peer closely at the screens in front of them – there are no half measures with pixels 16.

Using the example above, you would end up with something like this:

Hand drawn pixelated dolphin

Natural image converted to “pixels”

Some students are resistant to this stage because:

  1. It destructively edits their artwork
  2. The resulting blocky thing looks a bit rubbish

That’s good – it makes for excellent discussion fodder. Tell them to push through it.

This brings us to the end of my first lesson on data representation.

In the next lesson, students will look at recreating their hand-drawn representation on screen (and the artistes mentioned above will have an opportunity to improve the pixel version) and then figuring out how to convert that to numbers.

Opportunities for Enrichment & Real World Context

The process by which students take their “natural” image and selectively colour in pixels is akin to the process taking place when a picture is taken in a digital camera.

Photography as a medium is effectively “painting with light” – coloured light enters through a lens and strikes a digital sensor 17. The digital sensor has the capacity for a certain number of pixels – usually in the tens of millions as at the time of writing this.

The camera has to make the same kinds of decisions as the students – which pixels to turn wholly one colour or the other.

For our students, the process is slightly simplified as we work in true black and white – only one colour – and we are working with a resolution not much more than 20×20 pixels.

My slides include a representation of the same pixels-on-a-grid image but drawn over pixels half the size (therefore, twice as many pixels or twice the resolution). Students can see that increases in the number of pixels per area of image will result in a more faithful representation of the natural image.

Cats, increasing in resolution

From L-R: A “natural” image, very low resolution, double resolution. Original image is “bleeding” outside the lines to demonstrate the process the students should be following by hand.

Students should also be able to see pretty soon that there are drawbacks to higher resolutions – twice the resolution means twice the number of pixels to “process” and remember, which links very neatly to the reasons why a video game will require more power at a higher resolution or why a better quality photograph will require more space on a hard disk.

A Cryptic Education – Substitution and Steganography

As part of the digital technology curriculum, I’ve been tweaking  and testing some lessons on cryptography with my year 9 STEM ICT specialist class.

As an opener, we considered a scenario in which one needed to get a secret message to a friend but couldn’t use the now traditional suite of electronic methods available in the average teenager’s tool belt (perhaps their parents are aggressively monitoring their device use?).

The method had to be very low tech – a handwritten note passed through an intermediary.18

What if, I suggested, the intermediary 19 reads the note and then tells your parents or other people?

Students at this point very reasonably suggested that you hand-deliver the note yourself or, you know, just talk to the person, but I either offered believable excuses or hand-waved them off (depending who you ask).

Suggestions to circumvent Eve’s potential treachery included writing the message in another language, the ol’ lemon juice and fire trick, using the ASCII number representation of each letter 20 and… murder.

I’m reasonably sure the last suggestion was tongue-in-cheek, but I’m watching that particular student a little more closely now.

This is the second time I’ve covered crypto with students around this age and I’m always surprised at how rare it is to find a student familiar with substitution ciphers (commonly Caesar). I guess it’s not a popular option for primary – but it does afford me the a chance to get my students constructing their own cipher tools.

We move on from this to more philosophical ground (with one eye on my assassin student) as I pose the question: “Should we have a right to privacy?”

I’m heartened that after a few minutes conversation, students generally reach a consensus that, yes, people should be able to keep their information private if they wish – no secret fascists here.

To make everyone just a little bit uncomfortable I also force the students to confront the following:

  • If you aren’t doing anything wrong, why should you be able to hide what you do from the government?
  • Now we all agree that privacy is vitally important, how do you personally keep your own data safe?
  • Who knows what websites you visit?

I ask these because I feel it’s necessary to confront three important (in very different ways) concepts.

Where do we draw the line on what should be private?

Students generally fall somewhere in the middle of the spectrum from “Our glorious government intelligence agencies should know everything we think and do” through to “You kent trust the gub’mint! We gots to keep our precious datas safe from EVERONE!”

Which is also heartening, I guess. But they’re ultimately left with the uneasy feeling that there isn’t an easy answer to the question of how we (or our authorities) decide it’s okay to spy on a person’s private communication and the mechanism for doing so.

What action are you taking to keep your data/communication private?

None, that’s what.

Or at least, that’s what the average year 9 decides. They’re a little alarmed to realise that they don’t really think about it.

Who knows what websites you visit?

Students confidently assert that they just use incognito mode or delete their history if they wish to keep their browsing secret.

I point out that their ISP knows everything they do (with timestamps!) unless they first use a tunnel or VPN.

Also, any time they use a gated Internet connection – like the school – the IT staff can summon their browsing history at will.

Some students reconsider their life choices.

Back on track – Steganography

Now that my class has indulged my diversion, we get back on track. I mention that hiding messages – ala the lemon juice, and even arguably using another language – is considered steganography. In steganography, your message is only really secret if the method by which you hid it is kept secret too – if someone knows to look for something hidden, they’ll probably find it. One bright spark suggests writing an innocuous message and then putting the secret, inflammatory message in lemon on top, which is admittedly pretty clever. 21

(I don’t use the word obfuscate even though I want to because we just don’t have time to add it to our vocab list – but I think I regret that now. I’m a little tickled by the idea of my ex students wandering around, whipping out five dollar words they learned in ICT.)

We consider the idea of mirror writing – as that’s often trotted out as an example of keeping writing secret in the context of Leonardo da Vinci.

I’m pleased to note that a few students conclude that Leo probably didn’t use mirror writing to keep his work hidden, based on the fact that it’s not that hard to read backwards writing. A few hardened hold-outs insist that it would stop the average interloper casually reading over his shoulder, which is a fair assessment, but even they grudgingly give way when I point out that most people in his time were illiterate anyway, and he was (crucially) left-handed. We decide for now that his mirror writing was probably more for convenience than an effort to maintain secrecy. 22

As a final nail in the coffin of the effectiveness of mirror writing as a tool of secrecy, I display the following slide, with the commentary that it is actually pretty challenging to read mirror text fluently:


Taylor Swift lyrics, but backwards

This exercise is pretty mundane in and of itself, but in a class of competitive over-achievers, it is a thing of beauty.

All the students spontaneously and simultaneously break forth in a halting reading chant, reminiscent of early years primary students:

“I…. DON’T…. LIKE…. YOUR…. LITTLE…. GAMES….”

I secretly wish for someone important to barge into the room at this point and do a double take at our high-flying yet somehow remedial level reading students.

The competitive chant falls apart around 2/3 of the way through as a sufficiently large number of students realise I’ve tricked them into reading Taylor Swift lyrics under (somewhat) false pretences.

And with this, we’re pretty much out of time.

There’s an opportunity to recap concepts (privacy, hiding messages) before we’re done.

And after a whole lesson on cryptography, we haven’t actually covered any cryptography.

Boring ed stuff: LI 23 SC 24
Looking for a link to the slides? You can find it here.

Official RPi Touch Display – GPIO damaged by improper wiring

Some of my students have access to hardware for their projects and experiments, including various Raspberry Pi-s and alternative 25 operating systems and accessories.

Unfortunately, given the way the Pi interacts with HATs 26 and other similar devices via GPIO 27 pins, there is always the possibility that 5V will go where it shouldn’t and damage will be done.

In the case of the official Raspberry Pi Touchscreen Display, the device can be wired up to either receive or provide power to the Pi via jumper cables through the GPIO pins or provide power to the Pi via an included USB A port in the more “traditional” way.


When it comes to hobbyist hardware (and software!) there is an impetus to err on the side of giving the user as many options as possible.

When it comes to custom wiring, I think Murphy’s Law 28 should take precedence over hobbyist convenience. In other words, don’t even give us the option to power it via a method that will release magic smoke if done wrong.

There is some value in allowing users to power the Pi using the pins – and indeed this appears to be encouraged, as the enclosure that ships with the display only provides access to the Pi usb port.

At any rate, multiple options are available and inevitably, one of my students has configured one of the options that puts power where power should not go. As a result, neither the Pi nor the display are giving me any joy now when wired correctly.

It would seem that the Pi is beyond redemption – there is no display via HDMI and the SD card reader is unable to read cards.

The display is a happier story – there is no possibility to push power to or from it via the pins, but it seems perfectly happy to power on and pass power through via the USB port.

So just a quick note to anyone in a similar position – try your “dead” display with another (known working) Pi using the USB ports to provide power to both and you might find the display still has life yet.

Domain Specific Vocabulary and the Up Goer Five

If you’re not familiar with the “Up Goer Five”, it’s Randall Munroe‘s schematic of the Saturn V rocket annotated using only the ten hundred 29 most commonly used English words.

(I will not embed it in this post, because it’s HUGE, but feel free to click this here link to see it)

The Up Goer Five spawned Munroe’s book, Thing Explainer, which is an excellent resource for puzzling 30 the hell out of students who’ve been studying the topics covered.

Flipping through Thing Explainer got me thinking about how being forced to explain things in absurdly simple terms both often resulted in a more direct and exact description of a component and also (I imagine) challenged the author to avoid the use of domain specific language 31 and consider what, exactly, that vocabulary really means.

Ever since the existence of this text editor, I’ve been keen to throw my students up against the Thing Explainer to force them to really think about what special vocabulary and concepts actually mean – unavoidable if your explanation is to have any real value.

Is there any educational value to this exercise?

I don’t know for sure. But I can think of a few ways in which this might be beneficial:

  • Domain specific knowledge is tested
  • A deeper understanding of the concept
  • Develops the use of literacy skills

Let’s look at how I think the above benefits can be attained.

Tests Domain Specific Knowledge

Students (and teachers!) can become very good at using the right technical language to describe concepts they either don’t understand well or flat out don’t “get” at all. This particularly applies to students who are good at rote learning definitions of things.

Often this regurgitation technique is good enough to get some or all marks for an exam question, but if you don’t understand foundational concepts, you can’t build on those for more advanced concepts.

Removing the use of domain specific language takes away the ability to fudge your answers – in order to explain advanced concepts, the student needs to also explain all the concepts that make it up 32.

Develops a Deeper Understanding

“Rewording” existing texts is a skill, and it’s one that students generally seem to hate practicing. Rewording using a limited vocabulary actually scaffolds this task – instead of pulling out a thesaurus and substituting vocabulary, students are forced to consider re-explaining the concepts in new ways.

Explaining things in genuinely new ways is (as any teacher would know), one of the best ways to deepen one’s understanding of a topic.

Develops Literacy

Wouldn’t simple language be a poor way to develop literacy?

I would suggest that, no, in fact it should improve students’ literacy by forcing the remapping of more complex and domain specific terms into the simpler language that defines that vocabulary.

Examples and Problems

My example for students was as follows:

A box with a round part inside. Bits of the round part can be turned on or off to remember things. When the power goes off, the round part still remembers. An arm can look at the round part and see the bits that are on and off.
Finding or changing the on and off bits on the round part takes a long time.

We’ve been looking at computer hardware for part of this first term and so they were familiar enough with hard drives to be able to correctly identify the component for that description.

I’ll admit I cheated a little here – the use of the word “bit” can be read both as a colloquialism and in its domain specific form 33. In my original explanation, I reversed the use of “part” and “bit” to deliberately avoid this, but ended up switching them back to avoid confusion.

Instead of the usual technical language describing spinning platters and reading heads and so on, we get to the nub of the issue: a hard drive is for long term storage (remembering) and it’s relatively slow. To differentiate it from other forms of secondary storage we look at some implementation terms (platters are round and an arm with a head is used to read them).

Certainly there are limitations here – it might be nice to be able to use concepts like “magnetism” to really hammer home the physical representation of binary data – but it forces a student who has learned the rote definition of hard drive (“secondary storage that uses magnetic fields to blah blah blah”) to actually consider what a hard drive really is.

Let’s have a look at some student examples:

1.A group of memory that mirrors it self on to another group of memory to keep a back up of what is stored on it.

2. A group of memory that puts half of what is known onto another group memory

We’re describing the concept of RAID – certainly level 1 first up and possibly level 0 second, although in this case I would send it back for further clarification.

1.the pretending of another computer that is run on another thing. It can be used to use the computer from another place.

2.the storing of stuff in many different places so that stuff can’t be lost, and it is easy to get.

3.the same way that a computer is made to be used in work, this means a place for work can have an even and matching thing for use for people.

The first item in this list is a beautiful example of what can be produced using Thing Explainer vocabulary – we’ve avoided all use of the term “simulation” or “virtualisation” to explain what virtual machines are.

As we get towards the bottom of the list, we run into the frustrations or limitations that some students encounter when trying this for the first time – the temptation to overuse words such as “stuff” (when explaining data in cloud storage) or to become fixated on a particular aspect of a concept (when explaining a standard operating environment) can cause an explanation to miss its mark.

When lots of stuff is put into a place so that if the stuff goes away then the stuff can be gotten again.

Despite the overuse of “stuff” in this one, all it really needs is a little context to help clarify that we’re referring to a backup of data.

Worth Pursuing?

All in all, I’m pleased with the results thus far. Students were satisfied with my justification of the activity and quickly saw the value in using this as a revision technique.

Would this work for younger students? I’m not sure, but the opportunity should present itself in the near future.

Command Line History Search in Ubuntu Desktop

Just a quick note: I usually use server only Linux installs, but I’ve been trying out deb based desktops lately.

Ubuntu desktop doesn’t seem to honour the .inputrc file in the home directory – I usually use this to allow command line history searching:

"\e[A": history-search-background
"\e[B": history-search-forward

With my server installs, that’ll let you use the up and down arrows to go back and forth through your history as usual, but if you start to type a command it’ll only go through the commands in your history that match what you’ve typed so far.

I find this behaviour to be really intuitive, to the point that it’s frustrating to use terminals without it.

It took some experimenting to find the solution, but in Ubuntu Desktop, the right file to edit is .bashrc and the lines are a little different – explicitly binding the functionality of the keys:

bind '"\e[A": history-search-backward'
bind '"\e[B": history-search-forward'

Ah – such a relief to have this working again in all my terminals!

ISPConfig & Let’s Encrypt

The guys at ISPConfig do good work – although it can sometimes get in the way of my own server configuration, the vast majority of the time it saves a huge amount of effort on what would otherwise be mundane and routine tasks.

With FOSS solutions like this though, “must-have” features don’t always come quickly – CPanel implemented Let’s Encrypt functionality very early on, but ISPConfig users had to wait 6 months (which is pretty fast considering the circumstances).

I needed a solution immediately though, which is why I rolled this (reasonably awful) automation to integrate.

The solution has worked well enough for the past 12 months or so (although implementation on slave servers wasn’t easy or pretty), but I figured it was time to upgrade to ISPConfig 3.1 – with built-in Let’s Encrypt support.

It’s almost always best to stick with the native solution rather than a third party one (particularly when the third party one is developed by a time-poor hacker), and that rule largely applies here. Continue Reading…

Python: The value of “with”

I never learned to code with Python; my first forays into development were with batch files (I kid you not) and then Visual Basic (which taught me many things I spent years unlearning).

Python is, in many respects, a great language for learners (which I’m not going to discuss today).

There is however, a great deal of… less than intuitive show-off code that can be, nay is encouraged to be, written using the language. Solutions are deemed to be “Pythonic”, a term as nebulous as “elegant” and often resulting in code just as unreadable to the casual observer or Python learner.

In some respects, this is about reducing the number of lines written – something fraught with peril for someone new to coding.

But there is a seductive element to Pythonic solutions – they don’t require you to twist yourself up in lines of boilerplate just to overcome a (often commonly encountered) problem.

The “with” keyword is not especially unique to Python, but is actively encouraged, and with good reason. This is one case where fewer lines is definitely better. Continue Reading…